
2.2. Virtual Environment#
We want to create a project directory for your project and a Python virtual environment within that directory for managing Python and all installed package files.
2.2.1. Creating Project Directory#
In general, when we create a project, it means we are creating a folder/directory. To use a project directory, we use the command line interface (CLI) of your OS. Since they are CLI rather than a graphical user interface (GUI), we need to use commands to create folders and navigate the paths. Although this can be done with a GUI file manager, knowing how to use the CLI is a good skill set to have in the long run. The three shell commands that we use here are:
ls(“list storage”),mkdir(“make directory”), andcd(“change directory”).
For the purpose of clarity, we want to create a workspace directory within your user’s home directory, and a py directory within the workspace directory.
Note that macOS and Linux use forward slashes for directory separators, while Windows uses backward slashes as separators (Windows can also interpret forward slashes).
We use PowerShell instead of Command Prompt as our CLI here because the syntax is more friendly.
PS C:\Users\[user]> mkdir workspace
    Directory: C:\Users\[user]
Mode                 LastWriteTime         Length Name
----                 -------------         ------ ----
d-----         8/31/2025   3:14 AM                workspace

PS C:\Users\[user]> cd workspace
PS C:\Users\[user]\workspace> mkdir py
    Directory: C:\Users\[user]\workspace
Mode                 LastWriteTime         Length Name
----                 -------------         ------ ----
d-----         8/31/2025   3:14 AM                py

PS C:\Users\[user]\workspace> cd py
PS C:\Users\[user]\workspace\py>
Use Terminal.app as CLI here for this task.
[user]@[host]ː~$ mkdir workspace
[user]@[host]ː~$ cd workspace
[user]@[host]ː~/workspace$ mkdir py
[user]@[host]ː~/workspace$ cd py/
[user]@[host]ː~/workspace/py$
After issuing the above commands, you will have a project directory (py) inside the workspace directory, and your current location is inside the py project directory.
2.2.2. Creating Virtual Environment#
In the py project directory, we will create a Python virtual environment for the project. This means that we will place all installed packages (dependencies) that we use in the site-packages directory of the virtual environment rather than installing them in the system Python, which is prone to conflicts when different versions of software packages are installed or upgraded.
On the other hand, installing the packages in the project virtual environment also means that we are making this environment portable, meaning we can replicate the dependencies in another project or device. Note that, in addition to the installed project, the virtual environment also contains a link to the desired Python version.
The syntax for creating a Python virtual environment is:
python -m venv <environment_path_and_name>
Note that, in Windows, in addition to python, you may use the py launcher to achieve the same goal.
To create the virtual environment for the project, we issue the command as python -m venv .venv, in which python is the default desired version of Python, -m means module, venv is the module that creates virtual environment, and .venv, as a convention, is the name of the project virtual environment.
If you want to control which version of Python to use (3.12, for example), you will use the version suffix by issuing py -3.12 -m venv .venv (Windows) or python3.12 -m venv .venv (macOS) to specify the Python version to use (which may be different from the system default Python version):
Start PowerShell and change directory into your project folder. If you want to specify a Python version, use the version suffix in the example.
PS C:\Users\[user]\workspace\py> py -m venv .venv
PS C:\Users\[user]\workspace\py> ls
    Directory: C:\Users\[user]\workspace\py
Mode                 LastWriteTime         Length Name
----                 -------------         ------ ----
d-----         8/31/2025   3:36 AM                .venv
You see that ls shows that .venv virtual environment folder is created.
Start the Terminal.app and change directory into the project folder. Since .venv is a hidden directory because of the . at beginning of the folder name, you need to use the -a (means all files) option to ls to show it.
[user]@[host]ː~/workspace/py$ python3 -m venv .venv
[user]@[host]ː~/workspace/py$ ls -a
.     ..    .venv
[user]@[host]ː~/workspace/py$
Using the ls command, we see that the virtual environment .venv folder has been created.
PS C:\Users\[user]\workspace\py> ls
    Directory: C:\Users\[user]\workspace\py
Mode                 LastWriteTime         Length Name
----                 -------------         ------ ----
d-----          9/4/2025   9:41 PM                .ipynb_checkpoints
d-----          9/4/2025   9:41 PM                .venv
In macOS, using ls you will not see the .venv folder because file and directory names beginning with a dot are hidden. Also, the -l option show the files in long format. To see the .venv virtual environment in shell, add the -la options to the ls command: $ ls -la.
drwxr-xr-x  10 tychen  staff   320 Oct 31  2025 .
drwxr-xr-x  40 tychen  staff  1280 Sep  7 17:14 ..
drwxr-xr-x  10 tychen  staff    320 Oct 31  2025 .venv
Inside the .venv virtual environment directory, there is a lib directory containing a folder called site-packages, where all packages are installed. Additionally, all binary codes, including links to Python executables, the venv activation scripts, pip, and other program executables, are installed in the bin (macOS) folder.
[user]@[host]:~/workspace/py/.venv$ ls -la
total 32
drwxr-xr-x  10 tychen  staff   320 Oct 31  2025 .
drwxr-xr-x  40 tychen  staff  1280 Sep  7 17:14 ..
drwxr-xr-x  91 tychen  staff  2912 Feb  9  2026 bin
drwxr-xr-x   4 tychen  staff   128 Apr 28 21:48 include
drwxr-xr-x   4 tychen  staff   128 Oct  4  2025 lib
-rw-r--r--   1 tychen  staff   301 Oct  4  2025 pyvenv.cfg
[user]@[host]:~/workspace/py/.venv$
In Windows, the site-packages directory appears as follows. So far, we only have pip, but every package you install will have a folder here, and soon the list will be long.
PS C:\Users\[user]\workspace\py> ls .venv\lib\site-packages\
    Directory: C:\Users\[user]\workspace\py\.venv\Lib\site-packages
Mode                 LastWriteTime         Length Name
----                 -------------         ------ ----
d-----         8/31/2025   3:36 AM                pip
d-----         8/31/2025   3:36 AM                pip-24.0.dist-info
In macOS, the site-packages folder looks like below. So far we only have pip but every package you install will come here and soon the list will be long.
[user]@[host]ː~/workspace/py$ ls .venv/lib/python3.xx/site-packages/
pip                pip-24.0.dist-info
2.2.3. Activating/Deactivating venv#
To activate your virtual environment, in the CLI, make sure you are in the project directory (py) and type the following command to activate the project virtual environment. After the virtual environment is activated, a prefix (“(.venv)”) will be present in front of the CLI prompt.
In Windows PowerShell, issue the following command (.\.venv\Scripts\activate) in your project folder to activate the project’s Python virtual environment. If the activation is successful, you will see a (.venv) showing up at the beginning of the command prompt line.
PS C:\Users\[user]\workspace\py> .\.venv\Scripts\activate
(.venv) PS C:\Users\[user]\workspace\py>
When attempting to activate the virtual environment, Windows users may encounter a PowerShell security policy error. The error message for Windows looks like below. This happens because PowerShell is blocking the virtual environment’s Activate.ps1 script because script execution is disabled for your user/session.
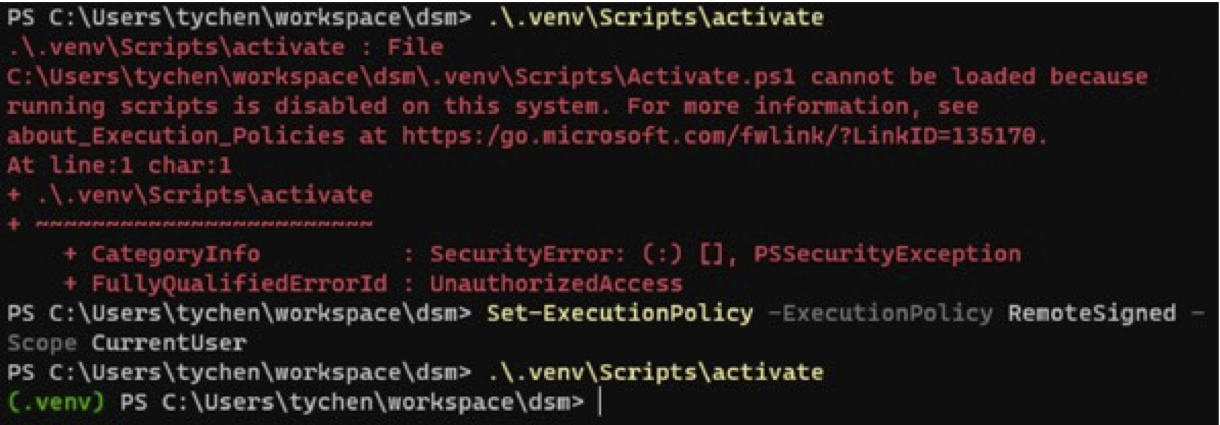
Fig. 2.8 venv Activation Error for Windows#
If it happens, issue the command as below in PowerShell (“Run as administrator” is needed if you don’t say -Scope CurrentUser at the end of the command as below), exit all PowerShell tabs, and restart PowerShell before you activate your virtual environment:
Set-ExecutionPolicy RemoteSigned -Scope CurrentUser
After executing the fix, you should be able to activate Python virtual environment in your project folder successfully.

[user]@[host]ː~/workspace/py$ source .venv/bin/activate
(.venv) [user]@[host]ː~/workspace/py$
When the virtual environment is successfully activated, you will see (.venv) appears before the shell’s prompt line, which tells us the virtual environment is activated, we are using the designated version of Python, and that all the packages installation will go into the site-packages directory.
2.2.4. Deactivating venv#
When you are done working on the project, you need to deactivate the virtual environment to prevent unintended installation of dependencies from other projects into this virtual environment. To do that, use the deactivate command (you can deactivate a virtual environment anywhere; it does not have to be in the project folder):
(.venv) PS C:\Users\[user]\workspace\py> deactivate
PS C:\Users\[user]\workspace\py>
(.venv) [user]@[host]:~/workspace/py$ deactivate
[user]@[host]:~/workspace/py$
After you successfully deactivated the venv, the (.venv) before the system shell’s prompt line will disappear.